After configuring certain options in Home and entering required data of your inventory in Stock, you are ready to perform the most important task of any Retail i.e. making a sale. Our POS provides a very simple yet efficient User Interface to make generating sales as easy, accurate and fast as possible.

There are multiple ways to input items in "Sales Invoice" Module
When you use a barcode reader to scan an item, it automatically gets inserted in the Sale or Purchase module in an item field. You can also type in the Barcode.
You can also insert item in sale/purchase module by manually entering Bar code, item name or item number in the search box or selecting them from Stock Module as explained earlier.
Insert any item manually using the following steps:
1- Enter an item’s number or barcode in the search box and press enter.
2- In case of searching by name, You do not need to input complete name as writing only part of it shows the item(s) in the items list search results courtesy of real time search. This items list on the right only appears when the user types an item’s name. Select the item from this list by pressing Enter or by double clicking on the item.
3- If a new item is selected, the "Quantity" will be 1. However if an item is added again its quantity is incremented instead of adding a new row in the invoice.
4- To change "Quantity" either press tab once or use mouse to highlight "Quantity" field and then change it.
5- You can also give discount if discount column is enabled. Enable the discount column by clicking the "Discount" button on the toolbar.
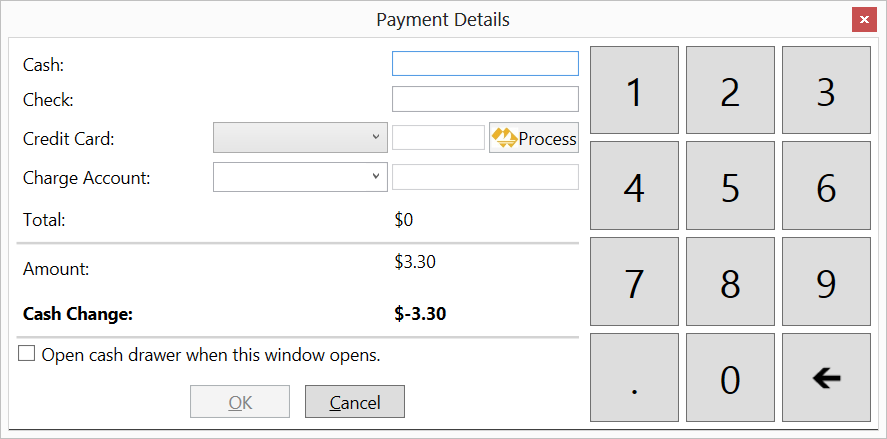
6- Select the correct "Payment Type" among "Cash", "Charge to Customer Account "or “Charge to Account”. Select "Ask on Commit/Prompt" for more options such as Credit Card and for Split payments.
The "Charge to Customer Account" option allows a selected customer to purchase items on credit from your Retail store and the total amount of invoice is charged to his account. The Charge to Account” option can be used if user wants to charge the customer credit to another separate account.
7- "Summary" shows you all the important data of current Sale Invoice like sub-total, amount paid and amount due etc.
8- “Customer” drop down menu lets user select a customer which can be linked to a particular Sales Invoice.
9-“Prompt” or "Ask on Commit" allow users an alternate way to select payment types and process a sale.
10- “Split Payments”. From the “Prompt” or "Ask on Commit" menu users can also choose to accept split payments. For e.g users can choose to process some amount of sale in cash, some via credit card (Merchant Bank Account) and the remaining amount to be charged to the customer’s account/tab.
To Delete or Remove entire row of mistakenly input item quickly, select the row and press "Delete" button from your keyboard.
Once the required items are entered along with correct quantities and discount (if any), you are ready to perform a transaction, so press "Commit" to make transaction or "Commit and Print" to print a receipt as well.
The Sale Invoice Toolbar provides various useful functions which are described as follows:
Clears the whole Sale Invoice screen
Loads any saved Sale Invoice from your computer
Allows user to save a Sale Invoice to be loaded or retrieved later. This can be used to hold Sale Invoices to be “Committed” or viewed later.
Allows user to handle returned items. Just enter the sold items in Sale Invoice screen and press “Return” button from either the “Toolbar” or below the Sale Invoice table. You can also “Return” items by first searching the Sale Invoice from “History” module and then pressing the “Return” button right next to “Delete Transaction” button.
You can return all the purchased goods from a particular Sale Invoice or choose only certain items to return by deleting the row containing the items.
Let user enter invoices in a previous date. Pressing “Old Invoice” makes the date selectable via Calendar menu thus allowing back date entries of Sale Invoices.
Allow user to export the current Sale Invoice to Microsoft Word file. This enables user to edit the Invoice, send it anywhere or print easily.
Prints the current invoice.
Pressing the “Full Screen” button enables POS to be used in Full Screen.
Pressing this button opens your Cash Drawer. Cash Drawer must be configured first in Home Module.
Provides discount on the whole invoice. It can be used in addition to the individual items discount.
Change Tax location during a sale or make the invoice tax exempt.
Use this button to accept Gift Cards issued by your store. Gift Cards need to be issued first from the Home module.
By Pressing the Favorite button (Star) near the Invoice Number, you can access the Favorite Items list from which you can quickly insert frequently sold items in the sale screen. Initially you will have to add your favorite items by pressing the Click here to Add button. You can edit this list via Edit Favorites and increase or decrease the viewing area by moving the horizontal scroll bar.
|
Home |
Updates |
Download |
Terms of Service |
Privacy Policy |
Site Map
Copyright TradeMeters.com 2010 | All Rights Reserved |